Scenes
Scenes are the most straightforward entry point to add content in your app, and every default project has one called MainScene.
Scenes at a glance
A Scene is a specialized Visual with its own lifecycle. Think of a scene as a supercharged visual that brings additional features to make more advanced things or simply give some structure to your project.
Most common scenes are the root scenes. Root scenes are scenes that are bound to the screen size so they take all the space. You can have multiple root scenes and those can be layered on top of another by setting their depth property accordingly.
You can also use additional child scenes that you can add inside other visuals. Those are not bound to the screen size.
Creating the main scene
In a default project, you can see there is a MainScene class (in MainScene.hx), which is a scene demonstrating how to load and display the Ceramic logo. That scene is added as main scene from the Project class (in Project.hx):
// Set MainScene as the current scene (see MainScene.hx)
app.scenes.main = new MainScene();
You can take a look at the default MainScene source code if you want to see what's inside the scene and what each method do.
The main scene is the main root scene. That means as a root scene it will follow screen size and get resized if needed.
The app.scenes object is the shared scene system, an instance of the SceneSystem type.
Adding layers: background and overlay
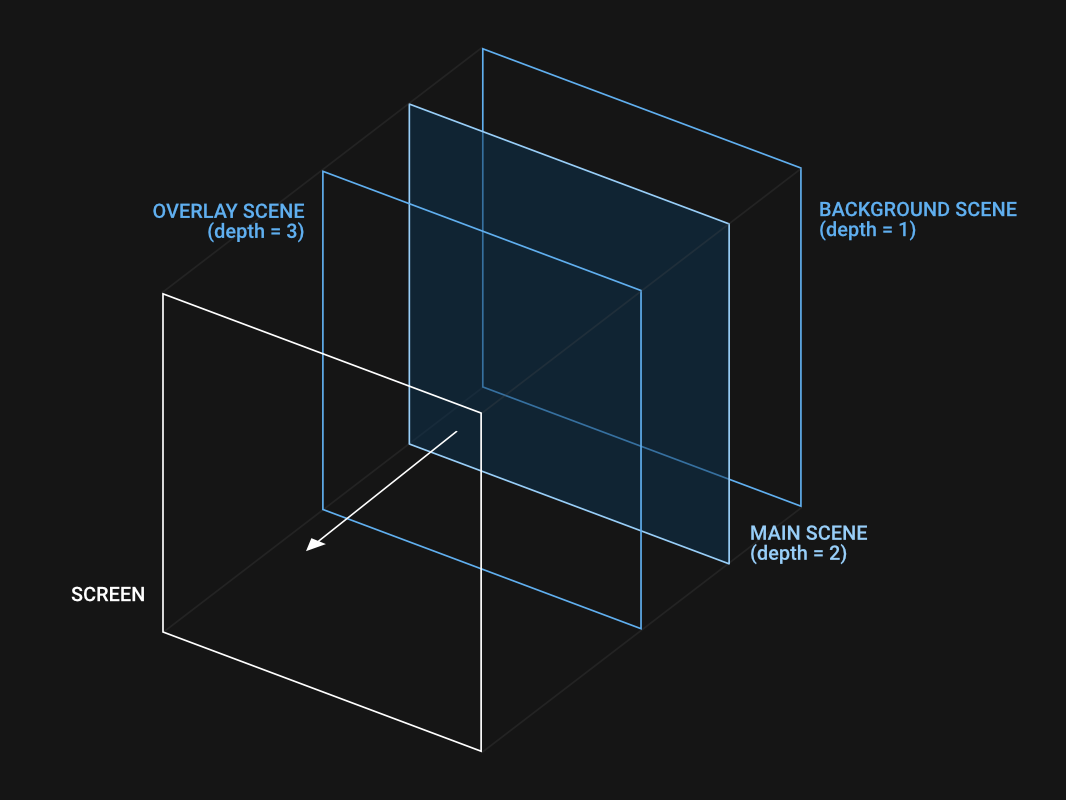
Having a single main scene is nice in many situations, but you might want to add a background that stays separated from the rest of the content, as well as some HUD overlay that is displayed on top of the main scene.
This is easily doable because you can have multiple root scenes and layer them on top of another by setting their depth property:
// Create background scene
var backgroundScene = new BackgroundScene();
backgroundScene.depth = 1;

// Create main scene
var mainScene = new MainScene();
mainScene.depth = 2;

// Create overlay scene
var overlayScene = new OverlayScene();
overlayScene.depth = 3;

// Assign those scenes as root in the scene system
app.scenes.set('background', backgroundScene);
app.scenes.main = mainScene;
app.scenes.set('overlay', overlayScene);
The code app.scenes.main = ... is a shorthand to app.scenes.set('main', ...). Both syntaxes are strictly equivalent.
We used the 'background' and 'overlay' slot names, but these are just examples. Any name can be used, and you can add even more scenes with in new slots etc...
Lifecycle of a scene
Each scene come with its own lifecycle. That lifecycle is defined from the status property (see SceneStatus). Each value of this status lets you know what is currently happening:
NONE |
No status. The scene is likely not assigned to anything. |
PRELOAD |
The scene is calling the preload() method. That happens when the scene is added as root scene or is added as a child of another visual. |
LOAD |
The scene is actually loading. Any asset that was added with assets.add() in the preload() method is getting loaded (see assets helpers in scene section). |
CREATE |
The scene has finished loading and is calling the create() method to fill it with any object, visual needed etc... |
FADE_IN |
The create() method has finished running so the scene is now ready to fade in. Default fade in implementation is instant, but this can be changed by overriding the fadeIn() method. |
READY |
When fade in has finished, the scene is marked as ready. |
FADE_OUT |
The scene begins to fade out, likely because it was explicitly asked to do so, or is being replaced by another scene. |
DISABLED |
Happens after fade out. When the scene has this status, it should not be used anymore. |
Changing scenes
You may want to switch from a root scene to another, like when moving from a title screen to the actual level of your game for instance.
This is covered by simply replacing any existing slot:
// Replacing main scene
app.scenes.main = new SomeOtherScene();

// Replacing `overlay` root scene
app.scenes.set('overlay', new SomeNewHUDScene());
Transitions between scenes
As mentioned in the scene lifecycle section, scenes can fade in and fade out. When you replace an existing root scene, its fadeOut() method is automatically called, and the fadeIn() method of the replacing scene is also called as soon as it is ready to be displayed.
Thus, you can create custom transition by overriding those methods in your Scene subclasses:
fadeIn() methodusing ceramic.VisualTransition;
...
/**
* Some custom `fadeIn()` implementation inside a scene
*/
override function fadeIn(done:()->Void) {
// Create a black opaque overlay
var overlayQuad = new Quad();
overlayQuad.size(width, height);
overlayQuad.color = Color.BLACK;
overlayQuad.alpha = 1;
// You might want to set a `depth` to ensure
// this overlay will be above your other visuals
// added in `create()` method.
overlayQuad.depth = ...;
add(overlayQuad);
// Transition this overlay to fully transparent
overlayQuad.transition(0.25, overlayQuad -> {
overlayQuad.alpha = 0;
})
.onceComplete(this, () -> {
// Fade-in has finished, so we
// can call the done() callback
done();
// Overlay is not needed anymore
overlay.destroy();
overlay = null;
});
}You can change fade out behaviour in the same way by overriding the fadeOut() method.
That's all about scenes for now
You should know a bit more about scenes now! Continue reading the next guide to learn about Filter objects, and also learn how they can be used with the scene system to make screen-wide visual effects!
Continue reading ➔ Filters