Filters
A Filter object is a visual that renders its content onto a RenderTexture and displays the result. It can be useful for various use cases that we will cover in this guide.
Overview
In a few steps, what a Filter does is:
- Render all the
visualsinside itscontentonto a render texture. - Optionally apply a
shaderto the resulting render texture. - Display the final result.
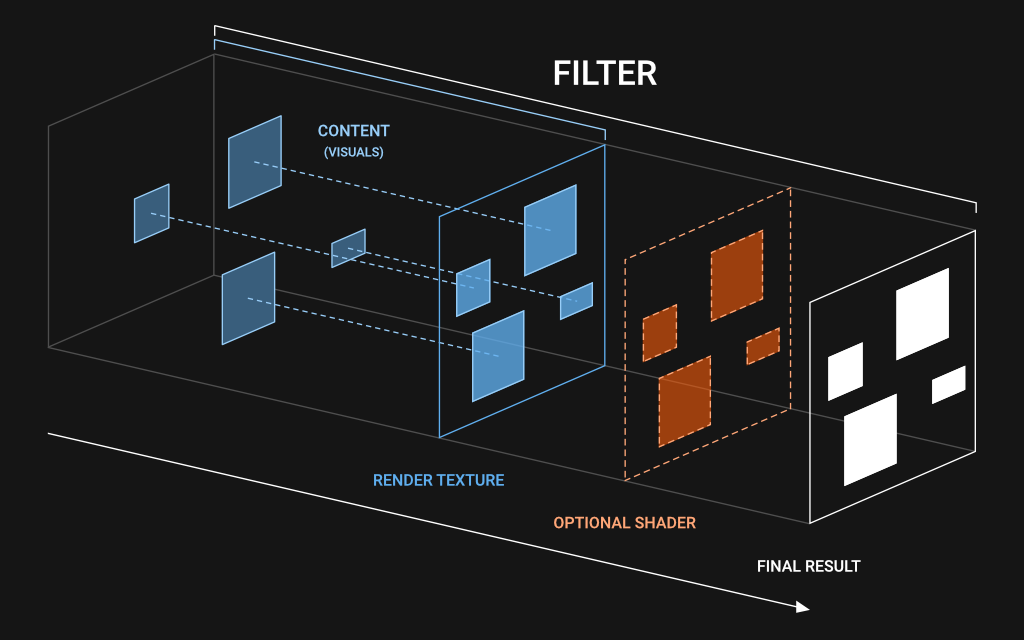
Filter works.Filters in action
You create filters like any other visual:
// Create a 800x600 filter
var filter = new Filter();
filter.size(800, 600);
add(filter);

// Add some visuals inside its content
filter.content.add(someVisual1);
filter.content.add(someVisual2);
In the example above, the two visuals someVisual1 and someVisual2 will be rendered onto the render texture managed internally by our filter.
Then the filter will display the result. Think of it as some container that draws/flattens everything it contains onto its render texture, then displays it!
Note that the visuals are added with filter.content.add() and not simply filter.add(). This is done on purpose: only visuals added inside the filter's content will be rendered onto the filter's render texture.
Applying a shader (optional)
Now that we have a filter, we can optionally apply some effects to it using a shader. Let's assume we have loaded Ceramic's built-in gaussian blur shader asset. We can use it on the filter:
// Configure our gaussian blur shader
var blur = assets.shader(Shaders.GAUSSIAN_BLUR).clone();
blur.setVec2('resolution', filter.width, filter.height);
blur.setVec2('blurSize', 6.0, 6.0);

// Apply the shader on our filter
filter.shader = blur;
That's it! Your two visuals someVisual1 and someVisual2 should look blurred now!
This technique is showcased in the gaussian blur example that you can try below:
Interactions
It can be hard to keep track of interactions such as pointer events when some visuals are rendered onto render textures.
Thankfully, Ceramic got you covered! If a visual inside a filter's content does listen to, say, the pointerDown event, it will work through the filter as well, even if the filter is transformed, rotated, skewed...
See for yourself on the following example, try to move your mouse around, see the related visual get highlighted, and click to see it react to become red:
Filter on the Scene system
Ceramic gives you a way to use a Filter on all root scenes. Pretty handy if you want to apply an effect screen-wide easily:
// Create a filter with the same size as screen
var filter = new Filter();
filter.bindToScreenSize();

// Use it as filter for the scene system
app.scenes.filter = filter;
When doing this, every root scene will be automatically put inside the filter's content.
Use cases
Filters are quite versatile as they can be used in various situations. Here are some.
Process a whole group of visual through a shader
This is the example that has been demonstrated above. You add visuals inside a filter's content, then assign a shader to the filter and that's it!
Apply blending or alpha consistently
Let's assume you have many visuals inside a common container and you want to make this container half transparent. Sounds easy right? You could simply set alpha = 0.5 to every visual and be done with it.
Except that if your visuals are overlapping each others it won't look like the whole container is half transparent. Instead each visual's alpha will add up and the result will be quite messy with different degrees of opacity.
However, if you add all these visuals inside a filter's content, and then set filter.alpha = 0.5. The alpha will be applied consistently!
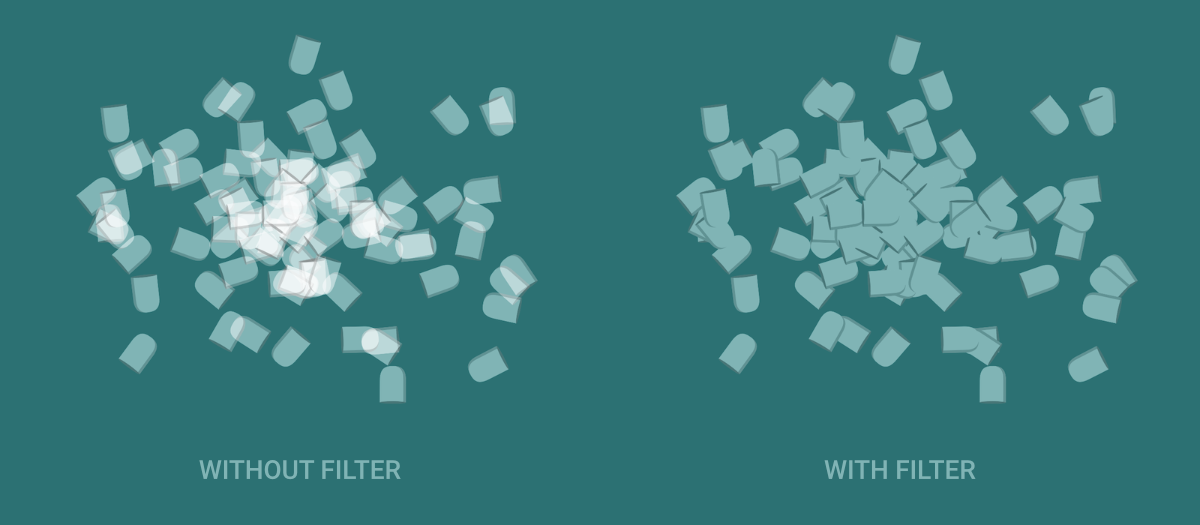
The same technique also works when using blending such as Blending.ADD. Instead of setting blending = ADD to every visual, put all the visuals in a filter's content and set blend = ADD to the filter directly.
An alternative to cropping / clipping
You can clip a visual and its children to the bounds of another visual using regular clipping like in the following code:
// Create a 400x400 quad
var visual1 = new Quad();
visual1.size(400, 400);
add(visual1);

// Create another smaller quad
// that we will use to clip the first visual
var visual2 = new Quad();
visual2.pos(300, 100);
visual2.size(200, 100);
add(visual2);

// This visual is only used for
// clipping so we make it transparent
visual2.transparent = true;

// Assign the clipping visual
visual1.clip = visual2;
This is fine and works quite well, but that kind of clipping can be very expensive because it can easily break batching and increase the number of draw calls.
In some situations, it can be worth it to use a filter, instead of this clipping technique, to achieve the same result.
Indeed, everything inside a filter's content is rendered onto a render texture, and that also means anything outside the bounds of the render texture will be discarded! Looks like what we want to do right?
Here is a code using a filter that should give the same visual result at the previous regular clipping example:
// Create a 400x400 quad
var visual1 = new Quad();
visual1.size(400, 400);
add(visual1);

// Create a filter to use as clipper
var filter = new Quad();
filter.pos(300, 100);
filter.size(200, 100);
add(filter);

// Add the visual to filter's content so
// that the visual looks clipped
filter.content.add(visual1);

// Compensate the visual's position
// to make it positioned the same
// as our previous example
visual1.pos(-filter.x, -filter.y);
Despite the need of allocating an additional render texture for it, using a filter for clipping to bounds can be more efficient than regular clip = ... because Ceramic supports multi-texture batching. That means the renderer doesn't need additional draw calls to blend filter's render textures with other visuals using other textures, while using regular clipping may trigger a lot of draw calls in some situations, like when a lot of visuals are adjacent to each other with similar depths and clipped differently. Filters are also a solution to unlock nested clipping, which isn't supported via the regular one. As always, it mostly depends on the situation and proper code profiling and draw debugging (with ceramic_debug_draw) is your best friend here to help you take a decision!
Render at lower resolution to improve performances
Another common use case is to render your app/game at a lower resolution to save precious GPU resources. Want your game to render at 800x450 on a 4K screen? Easy! Put everything inside a 800x450 filter's content and upscale the filter to match your screen size!
If you want to do that on all your root scenes, it is even easier because the scene system will upscale the filter for you, here is an example:
// Create a 800x450 filter
var filter = new Filter();
filter.size(800, 450);

// Use it as filter for the scene system
app.scenes.filter = filter;
That's all about filters
This should give you a good overview of what filters are useful for. Ceramic comes with some built-in filters, like the PixelArt filter used in several sample projects such as Tilemap Pixel Art or Pixel Platformer. Good idea to take a look!
Continue reading ➔ State Machines